

Clothes dryers cause nearly 3,000 fires a year across the country, according to the United States Fire Administration. And lint is the major culprit.
Laundry taking longer than usual to dry? The dryer itself becomes hotter to the touch when running? Or there’s a burning smell in the laundry room? These are some signs of lint build up in your dryer.
Besides being a fire hazard, dirty or clogged dryer vents reduce your dryer’s efficiency and performance, and may cause breakdowns over time.
So outside of having your dryer inspected annually by a washer/dryer pro (here’s your reminder to put it on your calendar!), here is how you can clean a dryer vent on your own. If you’d rather outsource this chore, ask the W/D pro and they can take care of it.
Step 1 – Gather the necessary tools: Before you begin the cleaning process, gather the following tools:
Step 2 – Unplug the dryer: Safety first (and always)! Start by unplugging your dryer from the power source. If your dryer is gas-powered, turn off the gas supply as well.
Step 3 – Locate the dryer vent: The dryer vent is typically located at the back of the dryer. It is a wide metallic or plastic tube that connects the dryer to the outside of your home. You may need to move the dryer away from the wall to access the vent more easily.
Step 4 – Disconnect the vent from the dryer: Using a screwdriver, carefully loosen the clamps that hold the vent to the dryer. Once loosened, gently pull the vent away from the dryer. Be cautious not to damage the vent or any electrical connections.
Step 5 – Clean the vent opening and lint trap: With the vent disconnected, you can now clean the vent opening and lint trap. Use a lint brush or an old toothbrush to remove any visible lint or debris. This step helps prevent clogging and improves the efficiency of your dryer.
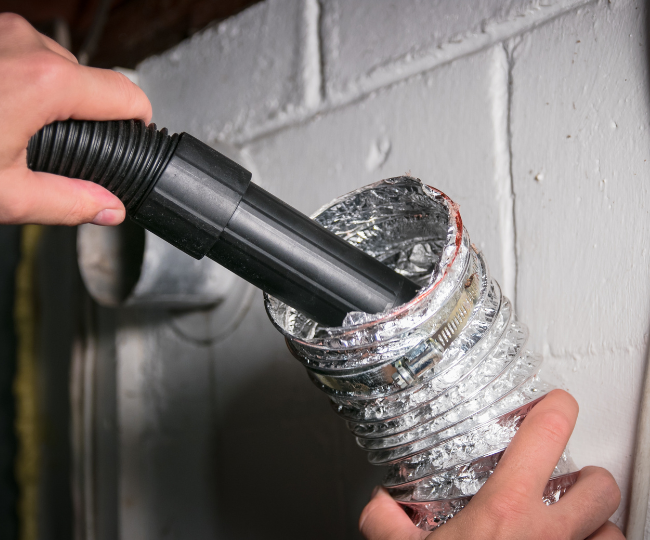
Step 6 – Vacuum the dryer vent line: Attach your vacuum cleaner’s long hose attachment and vacuum away! This will help suck out any lint or debris lodged inside the vent. Move the hose carefully through the vent, ensuring you reach as far as possible to remove all the accumulated debris.
Step 7 – Locate and clean the external vent: If your laundry room is on the ground floor or basement, go outside your home to locate the external vent. If it’s within safe reach, remove the vent cover and use a vent brush or a cleaning kit specifically designed for dryer vents to remove any lint or debris. Insert the brush or the cleaning tool into the vent and rotate it to dislodge any obstructions.
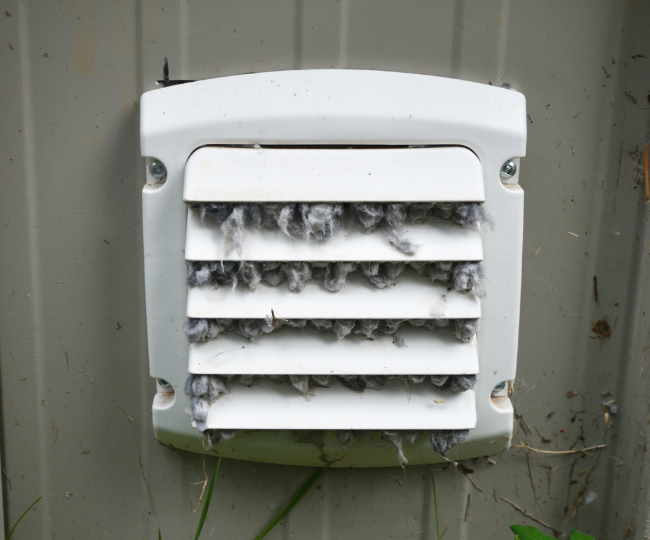
If your laundry room is on the second floor (as opposed to the ground floor or basement), you might need a pro to help, as reaching the vent may require a tall ladder.
Step 8 – Reconnect the vent: After cleaning the vent thoroughly, reattach it to the dryer using clamps or duct tape. Make sure it is securely fastened to prevent any air leaks.
Step 9 – Plug in and test the dryer: Once the vent is reconnected, plug in your dryer or turn on the gas supply. Run a test cycle to ensure that the dryer is functioning correctly and that air is flowing freely through the vent.
Step 10 – Put reminders for regular cleanings in your calendar: To maintain the efficiency and safety of your dryer, it’s recommended to clean the vent at least once a year. However, if you notice signs of reduced performance, consider cleaning the vent more frequently. Send yourself calendar invites for the next few years so you remember to do it!
TL;DR: Cleaning your dryer vent is a simple and crucial task that helps maintain the efficiency of your dryer and reduces the risk of fire. Remember to prioritize safety by unplugging the dryer and turning off the gas supply before starting the cleaning process. Always remove the lint – before every dryer cycle. And schedule your annual dryer maintenance!

An unfinished basement can cause mixed feelings: creepy, dark and dank, and a dumping ground for all the out-of-sight-out-of-mind things that ...


Subscription-based protection for when major
appliances and systems break down.
Stay up to date with the Dillo.

Home Warranty plans cover the costs of repair or replacement of major appliances and systems like HVAC, refrigerators, dishwashers, washer/dryers and so much more.
Armadillo is a technology company that makes requesting a repair and resolving the issue streamlined, easy, at your fingertips, and affordable.

Typical Home Warranty
A long legal contract. More pages means more conditions and exclusions – and more reasons to deny you service.

Armadillo’s Home Warranty
Shortest, most transparent and digestible plan in the industry. That means less fine print so that we can actually deliver for you.